TL/DR
- Exhaust fans should cycle the air every 1-3 minutes
- Most grow tents rely on passive air intake
- Oscillating fans are best at breaking up microclimates
- Negative air pressure is preferred for maintaining privacy
In Part 1, we covered the beneficial reasons “why” proper ventilation is so important for cannabis plants. Our journey continues as we look at the variables and equipment necessary to get the job done.
Welcome to Part 2 of our series about grow room ventilation. Today, we will focus on “how” to create proper airflow and the best ways to set up a ventilation system in several different grow room sizes.
In Part 3, we will cover the needed equipment and help you select the right one for your space.
What Do You Need to Create Airflow in Your Indoor Cannabis Grow?
The reasons for having good airflow in your grow space are clear, but you may still wonder about the necessary equipment to achieve good airflow. Although many of the same principles apply, ensuring good air flow in an open room differs slightly from creating good air circulation within a grow tent. This article covers both scenarios, but first, let’s look at the equipment used to accomplish this.
Regardless of the size, your tent or grow room ventilation system will include two inescapable pieces of equipment. They are an extractor fan for hot and humid air and fans for moving air around the cannabis plants. We’ll explain momentarily how to select the right size of fan based on cubic feet per minute (CFM). An extractor fan commonly uses a carbon filter to remove marijuana odors, along with ducting (and clamps) to connect the two pieces.
Equipment meant to treat the air, whether an air conditioner, dehumidifier, or humidifier, will also add an element of airflow into your grow room. Although these pieces aren’t often placed directly in a grow tent, they are working to treat the air as part of a passive intake airflow. Growers wanting to take an extra step to minimize pathogens and pests riding in on active airflow use pre-filters and inline filters to sterilize the air before reaching the grow space.
The Basics of Ventilation Systems For Growing Marijuana
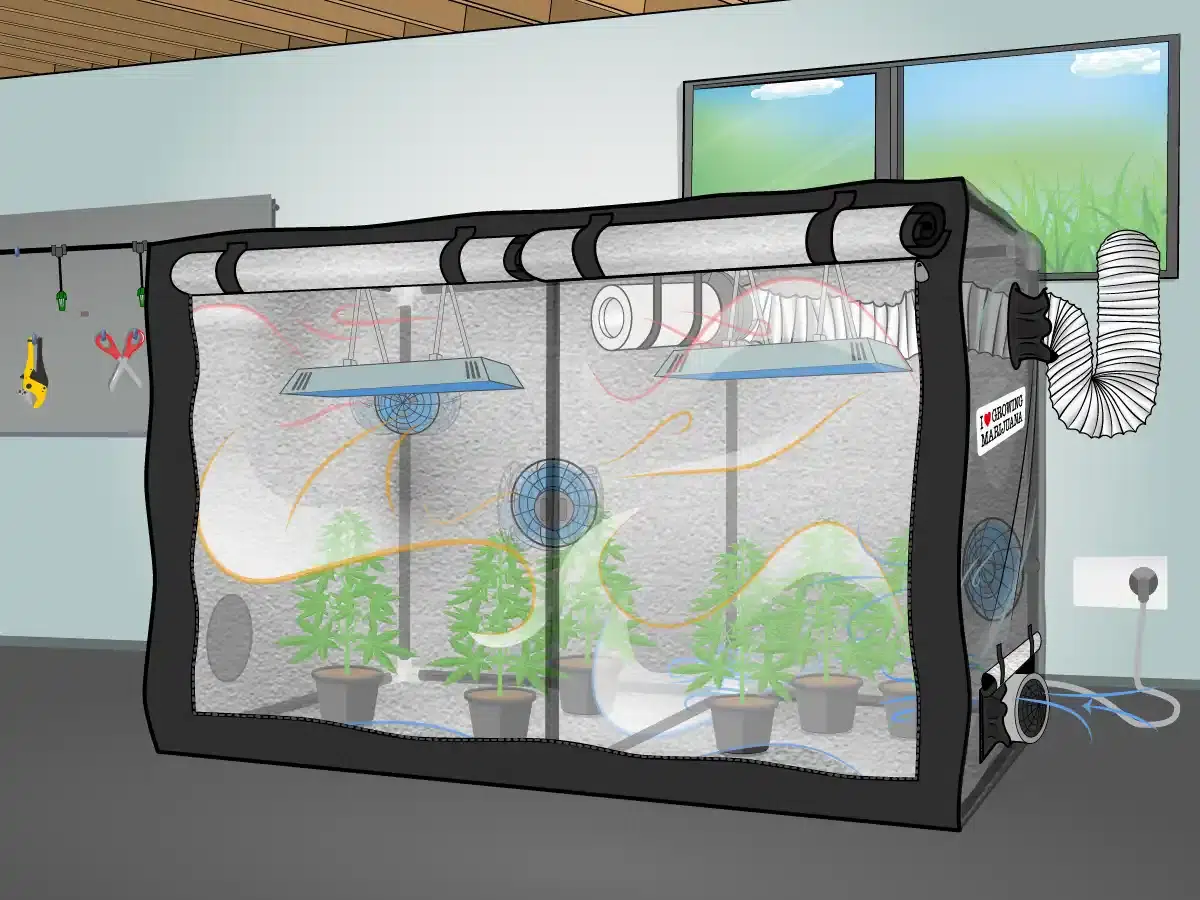
A growing environment should have two main airflow systems. In a basic sense, we have an exhaust system that takes warm, humid, smelly air from within the grow space and exhausts it outside the grow room. This suction causes fresh air to be drawn into the tent, which can be used to control temperature, humidity, and CO2 levels.
The other system helps improve air quality by mixing fresh air into the growing environment using internal circulation. Wall-mounted or clip fans (preferably oscillating) move that fresh air in and around the canopy, pushing out the humid, hot air from the core of the plants. Extractor fans remove stale air and exchange it for fresh air, completing the essential stages of the journey for good ventilation in a grow room.
In this diagram, we see an exhaust fan exhausting air from within the grow space, which causes air to enter towards the bottom of the grow tent. The oscillating fan mounted in the corners circulates this air around the growing area before it is sucked from the top of the tent by the extractor fan. Notice that this diagram has a circulating fan above and below the canopy. This is an ideal design for maximum circulation.

How Do You Get Air Moving Through Your Indoor Cannabis Grow?
Many take the complex and important journey that air takes through the stages of ventilation for granted. Air is invisible; why is it important for growers to visualize the journey from beginning to end? The answer involves awareness of the decisions and variables at each stage that a grower must consider to ensure the highest efficiency for plant growth. We’ve provided an overview above, but now we will look closer at the three significant stages: intake, circulation, and exhaust.
Intake: Getting Fresh Air into the Grow
There are two primary ways to ensure adequate air circulation. The first method relies on the suction created by the exhaust system, and the other method forces air into the space via a fan. Both methods have technical terms, which we’ll get into shortly. First and foremost, the air intake should be located at the bottom of the tent.
An intake aims to provide the grow space with cool, fresh air, which coincidentally carries higher levels of carbon dioxide (CO2). Intake air for grow tents will typically come from the area where the tent is located, aka the lung room. Larger grow areas have a larger need for fresh air and sometimes transport it from outside the building.
When using intake air from outdoors, it is important to use high-efficiency particulate air (HEPA) filters, which block spores, pathogens, and pests from hitching a ride on the air into your grow room. For added protection, growers often place a filter on the intake source and then again just before the airflow enters the growing area.

Active Vs. Passive?
Passive airflow relies on the strength of the exhaust fan. As the exhaust fan expels air, fresh air is drawn into the tent to replace the air that was just removed. Passive airflow allows natural forces to do their magic.
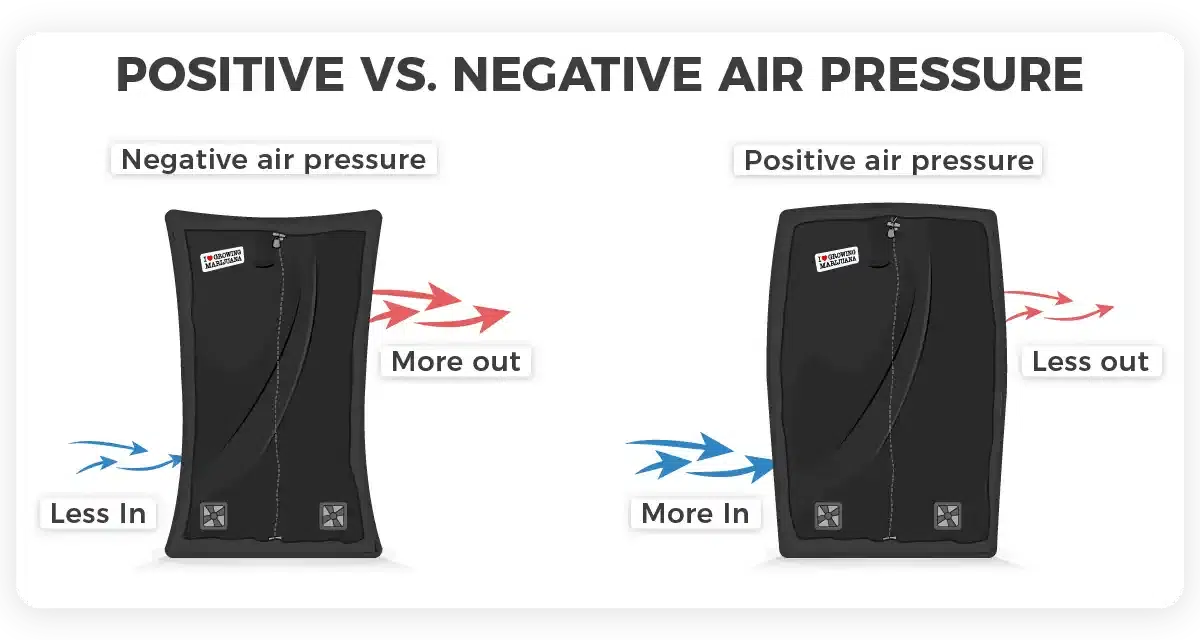
Active airflow involves a mechanical device (fan) to accelerate the addition of fresh air into the growing area. The balance in the volume of air in vs. air out will create either a positive or negative pressure.
Positive vs. Negative Air Pressure
The methods mentioned above will create either negative or positive air pressure in your grow environment. The easiest way for tent growers to tell if they have positive or negative pressure is to zip the tent to ensure it’s air tight. Do the walls suck in? If they do, you have negative pressure. If your tent walls puff out, you have positive pressure. The pressure is positive if air enters the tent faster than it is being exhausted— it’s negative if vice versa.
Stealth is important for many growers; whether you have positive or negative pressure can affect your stealth. Negative pressure happens when more air from within the tent leaves through the carbon filter than enters. This, in turn, means that the smell is contained and scrubbed. If you have positive pressure, air enters faster than it is exhausted, which forces untreated air to escape from the seams of your tent or from under the crack in the door to your grow room. Negative pressure is preferred in most cases.
Greenhouses and large grow facilities often rely on positive pressure as a form of IPM. When employees open exits to these facilities to come and go, the positive pressure blows outward. This is preferred over sucking air inwards since it can bring pests and pathogens into the greenhouse on that current of air. The positive pressure acts as an invisible air-powered force field.


How to Choose the Right Fan for an Active Intake?
Growers may be able to utilize a window fan and ducting as an active air intake, but others may need to be creative. Intake fans come in various sizes, allowing you to find one that fits your ideal dimensions. Larger areas will need more ventilation, requiring a larger, stronger active intake device. Most growers do not use Intake fans in spaces less than 6ft x 6ft (182cm x 182cm).
Experienced growers will often purchase a fan with more power than needed, letting a grower expand without needing to buy new equipment. It also allows them to run the fan at lower speeds. If an intake fan is working at its highest speed, it will be loud, and loud isn’t discrete. Having a stronger fan also allows for longer duct runs and more bends in the ducting if the air is being ported from outside. Bends in ducting reduce the efficiency of the airflow.
Moving Air Around The Grow
Having proper air circulation is important for optimal growth. The target rate of air exchange is once every 1-3 minutes. This means the amount of air exhausted every 1-3 minutes equals the volume of the growing area. To calculate this, we look for the fan’s cubic feet per minute (CFM) rating and determine the room volume in cubic feet.
How Many CFM Does a Grow Room Need?
To calculate the volume or cubic feet / cubic meter, multiply the length x width x height of the garden area. Once growers have that answer, they can begin shopping for an exhaust fan that can exchange the volume of air in the preferred window of time.
For example, if you did the above calculation and the answer was 800, you may think a 400 CFM fan would be perfect (because that exchanges the air volume every two minutes), but it’s not. Certain parts of the ventilation stream can reduce the effectiveness. Always buy a fan with more CFM than needed. We’ll cover all the essential details and tips for selecting the right gear in Part 3 of our ventilation series.
Back to focusing on getting the air moving in our grow space.
The Role of Oscillating Fans
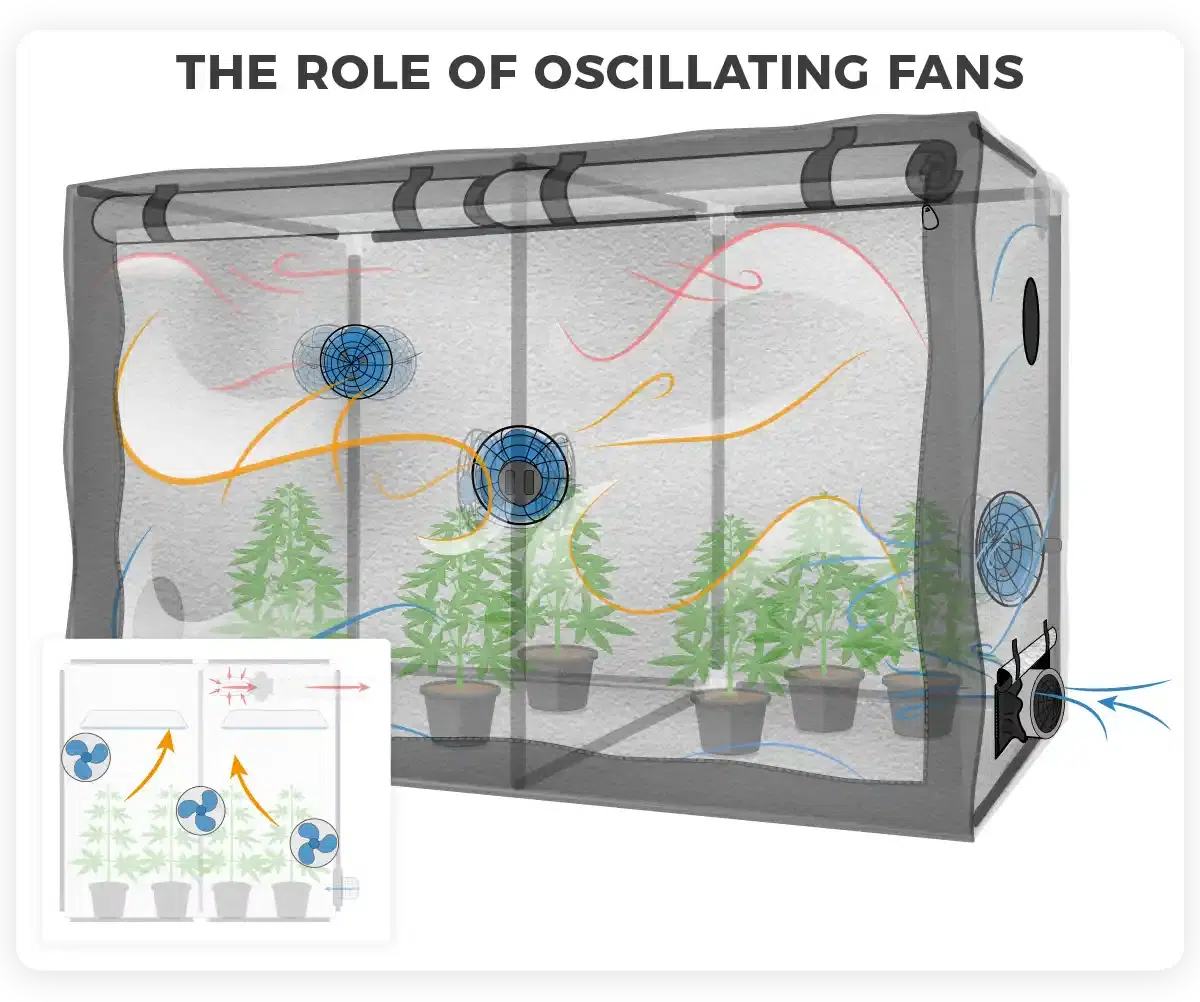
Oscillating fans are used for a couple of purposes. One is to mimic the wind, encouraging branches to grow thicker to support the growth. The main reason, however, is to stir the air around the canopy. This turbulence prevents micro-climates of moist, stagnant, hot air, which can lead to several plant-related problems.
Thick canopies can trap moisture in the underlayer while not allowing wind from above to penetrate and stir the air. For this reason, we recommend at least one fan below and at least one fan above the canopy in tents 3ft x 3ft (91cm x 91cm) or larger.
The Exhaust System: Getting Moist, Stagnant Air out of The Grow
Although the journey begins with the exhaust fan in a passive intake system, it also marks the end of the road for our friendly traveler on the wind. Without exhausting the grow area, heat would rise, humidity would spike, and the dank odors from your crop would linger.
Different configurations are possible
The internet may never agree on which way a roll of toilet paper is supposed to go on the roll. Similarly, there have been arguments about the placement of the carbon filter. Does it go before or after the exhaust fan? In both scenarios, smelly air inside the grow room enters the carbon filter and exits with the scents removed. I’ll tell you why placement matters in a moment.
Growers using HID systems with air-cooled hoods must also consider where they place the carbon filter in the ventilation chain. Other growers may not have the extra headroom in a grow tent for the exhaust fan and carbon filter. There are a variety of configurations possible, which you can read all about in our Everything You Need to Know about Fans, Exhausts, and Filters article.
Back to the question of whether a fan should suck air through the filter or push it out; placing the carbon filter before the exhaust fan lets the smelly grow room air suck through the filter and exhaust. This method generates less resistance on the fan motor, promoting a longer life for the equipment. Both ways will work, but for the longevity of your gear, place the carbon filter before the exhaust fan.
Double Carbon Filter for Less Smell
If growers are growing dank ILGM genetics and need to go an extra step for odor protection, using a carbon filter before and after the exhaust fan is possible. This doubles the amount of carbon scrubbing the air endures before being released outside the grow room. Going to such lengths is not common, mainly because of the additional wear on the exhaust fan. Still, it is possible for those of you who are wondering.
Setting Up a Proper Ventilation System in a Grow Tent
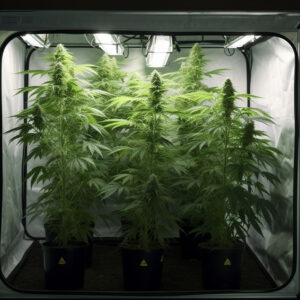
Grow tents often rely on passive air intake. Due to the limited space inside grow tents, equipment meant to condition the air is often placed outside the tent. Air conditioners, heaters, dehumidifiers, etc., all work to maintain the ideal conditions in the room lung room, where the tent receives fresh air. If using an active intake for your tent, place the intake fan on one of the lower vent ports, preferably one that a pot will not block.
An advantage of using a grow tent is that they have several intake/exhaust ports you can choose from. Their design makes creating an efficient exhaust system simple, as you simply hang your equipment and exhaust it from the upper section of the tent. In most cases, growers can hang the carbon filter, exhaust fan, and ducting that leads out of the grow tent in a straight line. By reducing the length of the ducting and eliminating bends in the ducting, your fan will work more efficiently and last longer.
Too much direct wind on a plant can cause wind burn, which is why there is some strategy for placing your circulating fans inside the grow tent. We recommend placing at least two fans in opposite corners of the tent. One circulates air just above the canopy; the other circulates air below the canopy. If you don’t have oscillating fans, aim the airflow off the nearest wall to try and create a whirlpool of wind around the canopy.
Setting Up a Proper Ventilation System in a Cupboard (micro grow)
Micro grows can be challenging because the smaller volume of air heats up and becomes humid in less time than a full room would. To learn more about setting up a complete micro grow, visit our Cannabis micro grow article. All of the benefits and principles of ventilation we’ve described still apply. Passive air intake is common for micro grows.
Growers often need to create a custom exhaust port to exhaust a micro grow. Grow spaces of this size can use a smaller, 4-inch exhaust fan, which will have plenty of CFM to clear the space every 1-3 minutes. The fan blades’ movement creates vibration, creating an audible humming. To increase the stealth of your micro grow, use yo-yo cords or bungees to suspend your exhaust fan in the air.
Generally, one oscillating fan can create the necessary air circulation within a micro grow. Some growers have used computer fans to move air in micro grows, but those have an effective range of only a few inches. The airflow must be enough to break the leaf boundary layer but also gentle enough not to cause wind burn. A fan with adjustable speeds greatly benefits smaller grows like these.
Setting Up a Proper Ventilation System in a Basement
Basement grows are like setting up a big room, except there is usually an extra layer of musty basement dankness to deal with. Finding a source of fresh air will be important. This could come from a ground-level window or a vent connecting to the floor above. Active air intake commonly helps provide adequate ventilation in such a large space. Whenever drawing air from outside, place a HEPA filter inline before the fresh air enters the grow room.
Ideally, growers will have a place to exhaust the air, whether a window, chimney or vent to an upper floor. Some growers have added an extra dryer vent cover outside the building to mask their exhaust system port. One of the larger challenges is ensuring you have a fan capable of moving the required CFM. Depending on room size, you may also need to consider industrial options.
The small clip fans used in grow tents won’t provide enough air circulation for a full basement. Industrial wall-mounted fans are common in full-room designs. Oscillating fans are preferred, but if unavailable, use multiple fans to ensure no pockets of stale air exist, particularly in the corners. You can learn more about room design in our Basement grow room tips article.

Ten Pro Tips for Better Air Flow in Your Grow!
- Buy a bigger exhaust fan with more CFM than you currently need.
- Choose oscillating fans over stationary fans.
- Choose fans with adjustable speeds – the more, the better.
- Defoliate your garden to allow air movement.
- Shorter distances of ducting reduce drag compared to longer runs.
- Straight ducting is more efficient than ducting with numerous bends.
- Use circulating fans above and below the canopy of your cannabis plants.
- Aim non-oscillating circulation fans off of the walls to create a swirl of wind around plants in smaller spaces.
- Hang exhaust fans. Wall-mounted fans will create vibrations that people on the other side of the wall can detect.
- Vent in the cool air from below, and vent out the hot air from the top of the grow.
**Bonus: Set up your ventilation before hanging lights and other equipment. It will make the task much easier.
Conclusion
Plans for providing good ventilation require more than just “moving air.” Growers must know how much air to move in and out of the tent and within the area. As you design your new grow room or redesign an old one, you now know if you’ll need active or passive intake.
In regards to keeping a marijuana grow undiscovered, there are a few key takeaways. Create negative pressure in the grow tent and hang exhaust fans instead of wall mounting them. Proper air flow leads to all kinds of benefits for your cannabis plants; plus, setting it up this way can also benefit the mind.We’ve got all sorts of useful, field-tried tips at ILGM. To learn more about other essential aspects of growing cannabis, download Roberts Grow Bible. If you have any questions about creating good air flow, please let us know in the comments. If you can’t wait to keep learning about ventilation, check out Part 3: Everything You Need to Know About Ventilation Equipment for Your Cannabis Grow.



I would love to get all the information on growing I can find. I will be checking my strains on the internet?
Hi Frosty,
You should be able to find any information you need here on our blog!
Let us know if you have any questions, of course, though!
Alex ILGM
Well I am a first time grower and need all the help I can get!