Did you know you can train your marijuana plant?
Plenty of experienced growers use a variety of techniques to shape their plants and encourage bigger yields.
These advance growing techniques make indoor growing more efficient and help them to get bigger marijuana yields.
Your marijuana plant may not look like it’s doing anything, but it is actually constantly looking for light.
Its leaves use its skill of phototropism to adapt to its surroundings as it searches for equilibrium.
It can change its shape by redirecting leaves, elongating branches and twisting shoots.
A marijuana plant can nearly grow in any direction in order receive enough light.
When a plant is grown indoors, it is limited. It may grow too tall and not have enough space to thrive or its natural shape may prevent light from reaching the bottom branches.
The triangular evergreen shape of the cannabis plant works well in nature, but not with grow lights.
The bottom of the plant is hardly able to receive any light!
However, with the techniques mentioned below, you can train your plant to grow in a way that works for your setup and leads to more buds.
But beware! Doing it wrong can cause your plant to stress out so only apply these techniques when you’re certain you’re doing it right!
Pruning for a greater yield
Pruning is a process of selectively trimming plants so that they produce the most flowers or fruit.
For marijuana plants, this means ensuring even the smallest amount of plants obtains the maximum yield.
Pruning techniques are often used by professional growers seeking to maximize results in a limited indoor growing space.

Not only are pruned plants able to produce more flowers, but they also are able to produce bigger and heavier buds.
This is because, by pruning, no energy is wasted on growing as many leaves and buds, leaving the remaining ones free to thrive.
Multiple pruning techniques help your plant catch more light and generate bigger buds. We go in-depth into each of these techniques in our guide on pruning cannabis plants, but here’s a short list to give you an idea:
You can even go a step further and bend the plants to your will with training techniques!
Better than natural
When left on their own, plants will develop more branches than they can support.
This leads to the eventual death of a certain amount of leaves.
Over time, these dying leaves will fall off, but you can optimize the process by cutting them off instead.
For plants that do not yet have dead leaves, removing weaker or less important branches (especially the lower branches) will also do the trick.
Pruning requires careful attention to your plants.
You must keep an eye on the internodes – the space between its nodes- and remove any branch that has developed long ones.
This is a sign that it is not receiving enough sunlight.
You should also watch for branches that remain lower than the main shoots.
They will not receive much light because they are blocked by upper leaves, and will ultimately be an energy drain.
Although most pruning refers to branches, some growers also choose to remove leaves.
Whether the practice increases the positive effects of pruning is debatable, because leaves make and store energy.
Growers should especially avoid cutting the large fan leaves, as they provide energy to the roots.
Because leaf trimming is so risky, some growers only cut leaves in half, or tie them up to stimulate results without harming the plant.
Download my free marijuana grow guide and find out more about growing bigger yields.
Don’t stress out your plants
Although pruning has beneficial effects on a growing marijuana plant, it can also cause dangerous levels of stress.
Like humans, plants respond to stress with a hormonal release.
In the case of marijuana, the response includes the release of jasmonic acid, a growth inhibitor. When jasmonic acid is released, plants stop growing and start healing.
This is the reason why over-pruning can lead to stunted growth.
To prevent this from happening, prune over a period of time rather than all at once.
A little bit of stress is okay for your plants (it encourages extra trichomes) but too much is torture.
Because pruning puts extra risks on plants, some growers prefer to let their plants grow naturally.
These growers often are already growing high-yielding plants, and do not want to risk slower or stunted growth.
Planning to prune
First of all, pruning should be done during the vegetation period of the plant’s lifecycle.
This is so the plant has enough time to recover from the process and grow big leaves.
If you are in a hurry to harvest, you can force them to flower afterward, but be sure to wait at least three days.
After pruning you will need to pay close attention to the health of your plants, ensuring they receive enough water and don’t suffer from a nutrient burn.
Proper pruning can lead to a more valuable plant, but care must be taken not to harm your plant in the process.
There are a variety of pruning methods that can increase the yield of your plant. We will discuss those below.
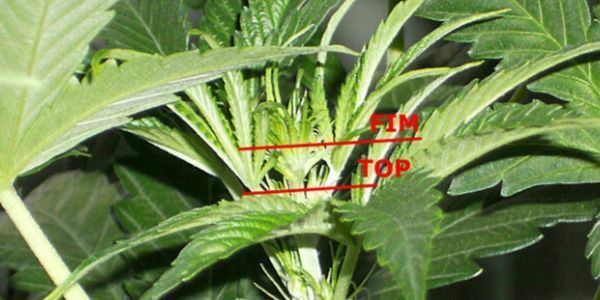
Topping marijuana for denser plants
If your plant is tall enough, you may want to consider trimming the top of its main shoot during the vegetative stage.
Not only will this cut down on some of the height, but it can also lead to two main colas at the top instead of one.
By simply pruning the tops of your plant, you can grow a bushier plant with more buds.

Topping helps marijuana plants grow bushier. When you cut a portion of the main shoot, you remove an important growth center in the plant, causing the growth patterns to change.
The main shoot facilitates communication with the leaves, helping shaded branches to grow outward.
This is potentially wasted energy if big buds are your goal.
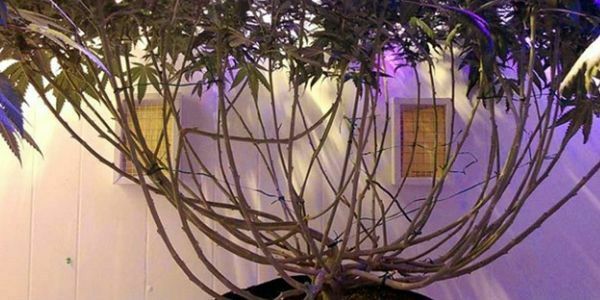
Since topping involves the removal of the central stem’s main shoot, it encourages the plant to grow into a bush rather than something that looks like a Christmas tree.
When you top your plants, they can grow in an inverted pyramid – like a cocktail glass with a whole bunch of buds on top. Cheers!
Topping is stressful on marijuana plants so it will extend the vegetative growing cycle.
However, this extra time is spent growing those new colas.
Despite the risk, it is still an excellent way of training your weed plant to fit into a limited grow space or to slow down stretching.
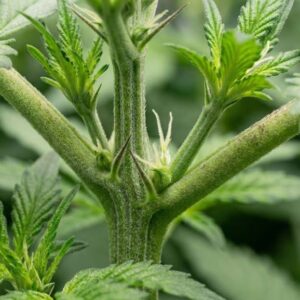
How to Top
Topping a marijuana plant is a common practice that can be used in conjunction with other advanced growing techniques to get the best yield out of your plants.
To top your plant, simply cut the top at the stem (between the nodes) directly above the leaves of the next node when it is young.
There should be between four and five nodes total on the plant when you attempt to top.
While topping typically refers to the removal of your plant’s newest node, it can sometimes refer to the process of cutting any tip off of any stem.
When it is done to the main shoot, however, it causes the shoots directly beneath it to grow faster and get larger.
It will also, however, sometimes cause the shoots beneath to slow down their growth.
To balance out the growth throughout the entire plant, repeat the topping process a few times.
Topping a plant affects the hormones in your plant. This can ‘confuse’ your plant, and it may stop growing while it figures out what is going on.
This period of stunted growth can last for up to a week.
Some growers prefer to top at night to help prevent this reaction, as most of the hormones travel to the roots at night and are less likely to be affected.
Plants that are topped too young are also more likely to experience stunted growth due to the loss of vital tissue, so look for strong stems and at least four nodes.
The FIMing technique
The dreaded, “Oh F*ck, I missed,” muttered by growers, has grown into a favorite pruning technique for creating additional colas without over-stressing your plant.
Also known as pinching, the technique of fiming earned its name from unsuccessful attempts at topping.
Whereas topping takes off a significant amount of the stem, Fiming removes less and is typically done by pinching, rather than cutting.
When done correctly, fiming can create bushier plants by creating four colas out of one pinch.
It is less traumatic than topping and does not make your plant any shorter.
Just like other types of pruning, fiming should be done during the vegetative stage.
While fiming is technically its own technique, it can produce less consistent results than other methods.
The colas will not come out evenly spaced, and they will not join the stem at the same place.
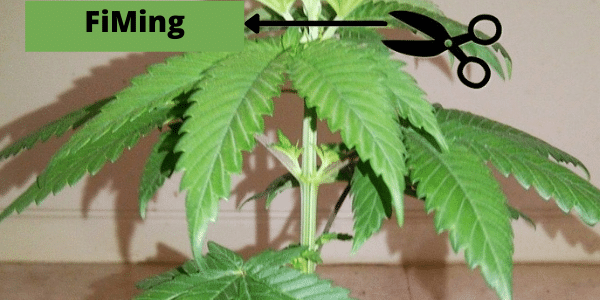
How to Fim
Fiming is relatively easy and is one of the least stressful ways to prune your marijuana plants.
To FIM, simply pinch the top at the newest growth, leaving some behind.
If done correctly, four new colas will grow out of that area. If done incorrectly, you may only see two or three.
You should FIM a plant when it has either three of four nodes.
Taller plants will not produce as good results.
Fiming is done by pinching, however, if you choose to cut the new growth, you should be careful to leave around 20% on the plant to make recovery easier.

You should also cut in a circular fashion so that what remains forms a cup.
Leaving a small amount of the original new growth on the plant helps trick it into thinking it should grow four shoots instead of two.
After Fiming, your plant may look a little odd. This is normal, and not anything to be too concerned about.
You will know your plant is doing well when the stems begin to thicken at the base.
This is a sign that the plant is shifting its energies to new colas, rather than the one it had been growing.
Also, because Fiming does not remove much of the plant, it does not slow down growth, and you should notice results relatively quickly.
Train your cannabis plants
Training cannabis plants is done by bending branches to make room for more light to pass through. More light equals more growth which results in higher yields. These are some of the most popular training techniques:
- Screen of Green (SCROG)
- Sea of Green (SOG)
- Low Stress Training (LST)
- High Stress Training (HST)
- Manifolding
- Lollipopping
- Trellising
- Super cropping
- Monster cropping
- Schwazzing
- Mainlining
Super cropping for stronger plants
If you’ve heard the statement, what doesn’t kill you makes you stronger, you already understand the concept of super cropping.
Super cropping is a powerful pruning technique that helps stimulate a healthier plant and leads to increased potency and higher yield.

Even though it is a pruning technique, there is no cutting involved.
It is done by crushing the interior of a stem, damaging its access to nutrients and water.
Once healed, you’ll have a more efficient plant with thicker stems and a stronger foundation.
When super cropping, you are damaging the soft inner tissue of your plant in order to detour growth hormones (auxins) to other areas.
This soft inner tissues are made of cellulose and include two groups that are responsible for transporting nutrients and water throughout the stem. These are the phloem and xylem.
When those areas are damaged, the plant will naturally start to rebuild by expanding the cellulose, increasing the space for nutrients and water.
With super cropping, the nutrient pathways within your plant go from being a congested roadway, to a major highway.
With a simple pinch, you control the flow of nutrients and water so that it goes where you want.
Super cropping can be used in a variety of ways. Pinch the main stem to affect the entire plant, or pinch and bend the side branches to affect how the plant grows.
Heavy buds need strong stems to support them, and super cropping helps make it possible. Super cropping can also lead to new colas on secondary branches.
This is because those branches can grow so thick that your plant will think they are dominant shoots and begin to form colas on them.
You are basically training your plant into creating additional tops that can flower.
Super cropping is an easy technique that is completed during the vegetative stage.
It is appropriate for non-autoflowering plants because you will have the most time to work with your plants (by extended the vegetative period).
This is not an option with autoflowering plants.

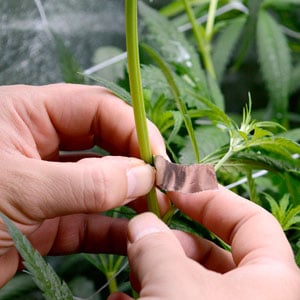
How to super crop
Super cropping is one of the easiest techniques for helping your plant grow stronger.
You’ll only need your fingers to trick your plant into thinking its top has been removed.
Plus, it is more gentle than topping and finning, because you do not break the stems.
Also read our ultimate guide on how to increase your marijuana yield: “How much marijuana can I yield per plant? A pound!“
Before you begin, you need to confirm that your plant is ready to be super cropped.
A good rule of thumb is 3 or 4 weeks old, but basically, it should be in its vegetative stage.
Then choose your area of cropping – most growers stay near the 1st and 3rd nodes. Everything under that point will receive increased nutrients.
Do not cut this area. Instead, pinch and twist the branch (at the same time), holding it between your thumb and pointer finger.
Bend the branch a little, but do not break it, you should only feel the soft interior collapse a little.
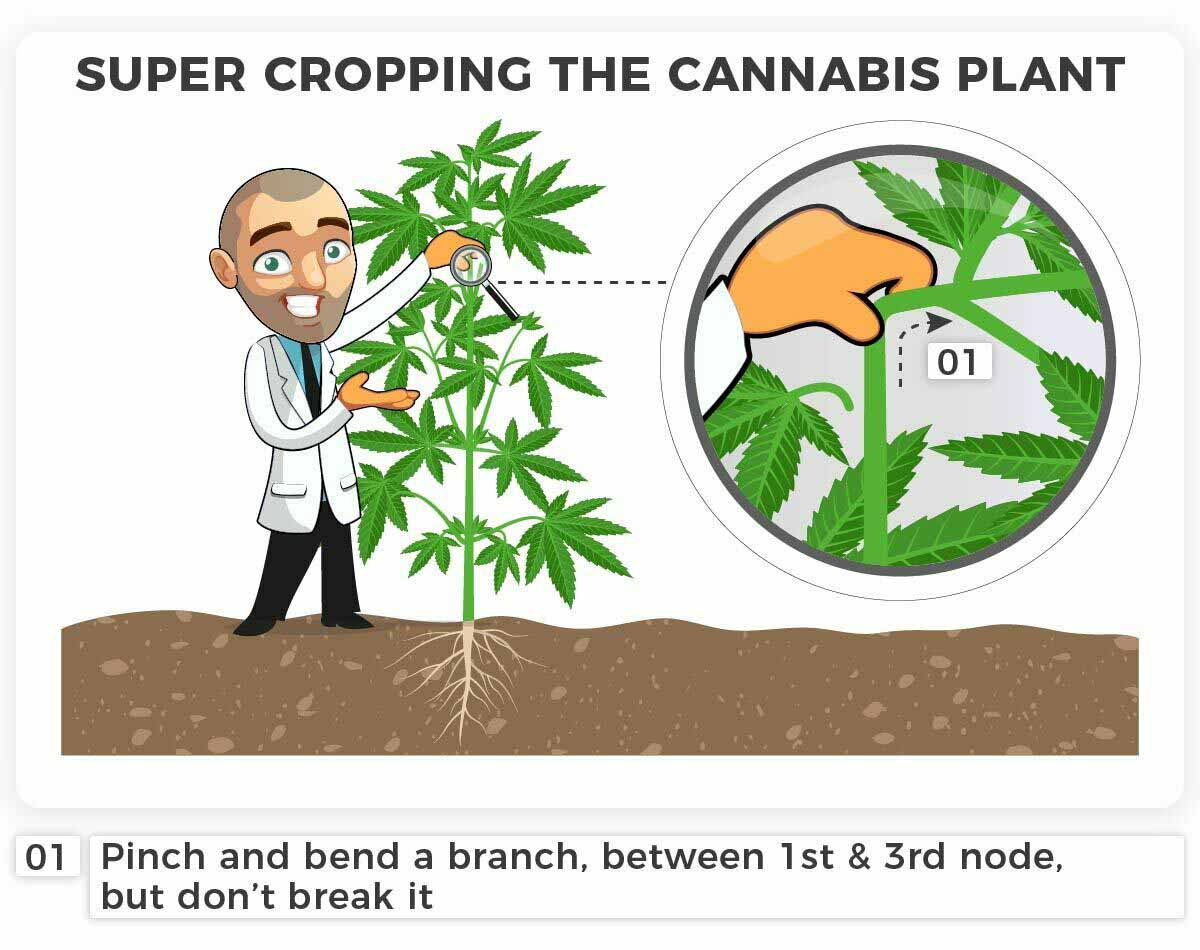
The area that you pinched may droop. That’s okay, it will heal (and grow back stronger).
Just be careful not to snap off the branch – kink it like a gardening hose instead.
If the healing process is taking too long, you can force your plant to remain in the vegetative stage until it is healed or string the branches up as support.
When branches need a little extra control after bending, tools for bending and securing branches can help keep them positioned without relying on loose string or rough wire. A flexible, plant-safe tie makes it easier to hold stems where you want them, support recovery after training, and keep the canopy opened up for better light exposure.
You want the stems to fold over for a little while. If the plant stands up an hour after you’ve pinched it, you did not pinch it enough.
You can crop as many branches as needed, and you don’t have to do the entire plant at once.
If you are a first-timer, test out a few branches first to see how the plant reacts.
Not all marijuana plants respond favorably to super cropping.
Monster cropping, grow huge plants
Creating clones out of flowering plants may have been unheard of before, but the technique of monster cropping is indeed alive and well.
It earned its name from the results you can expect to see – huge monster plants — and it is the most involved technique for creating a bigger yield.
Monster cropping is useful because it eliminates the need for mother plants.
By creating clones out of flowering plants, you can continuously make new plants while also cultivating your next harvest.
For growers with limited grow space, it is the best way to maintain an endless supply of marijuana.
Besides creating an efficient way to grow marijuana, monster cropping also creates large, bushy plants.
This is because the process of establishing the clones stimulates the offspring into becoming stronger and bigger.
These plants, who basically go through the vegetative stage twice, grow with extra nodes and branches. They are indeed cannabis monsters.
Once the plant is fully grown you will need to start thinking about flowering and harvest time.

How to monster crop
Unlike other pruning techniques, monster cropping is completed during the flowering stage, at least 21 days in.
Choose from one of the softer, lower branches. They will root faster.
Cut across the stem so that the largest surface area is exposed.
After this, move the young cutting into a glass of water to prevent air from entering its delicate vascular system.
That air could kill it. A small hydroponic setup or even a propagation bubbler is the ideal way to root your young clone and trigger a second vegetative stage.
Some growers also use humidity domes. Once your cutting is safely within water, the important thing is a constant supply of fresh oxygen.
Your clone will need a vegetative light schedule (18/6, 20/4, or 24/0) but it won’t need much light.
A single small CFL bulb will work just fine. While it is rooting, light pruning techniques are okay but do not disturb the flower on the apex.
Your plant will not look very impressive at first. Once they have rooted they will grow, but rooting your clone may take weeks, or it may never happen at all.
Look for the presence of un-serrated leaves. It is the first sign of growth.
You can also do some training techniques to encourage the process, such as tying down branches or applying gentle heat.
The safe bet is to create a few clones so that you have a better chance at success.
Once it starts growing, you will quickly understand why it is called monster cropping.
Monster cropped plants create tremendous results without the risky practice of fiming or topping.
Increasing light intensity
You will know your plants are having an issue with the intensity of the light by the way they are growing.
For instance, if your plants are in their vegetative phase and are not receiving a high enough intensity of light, they will “stretch” upwards toward the source of light.
This can lead to large spaces on the stem between nodes and leaves, or perhaps even growing tall enough to fall over.
Tall, lanky plants are not the type of plants that are going to get you a high yield – bushier plants will.
Once these stretched out plants have reached their flower phase, it will be difficult to get them an adequate amount of light to increase their bud growth.
To keep it simple, more light intensity leads to more (and bigger) buds.
It’s, therefore, easy to understand why it’s such an important factor for your marijuana garden.
Light is by far the most important factor that can affect any marijuana plant.
It is absolutely essential for the flowering phase of your marijuana plants, although many new growers don’t fully appreciate how much increasing the light intensity during that final stage is going to help their end yield.
The process photosynthesis is fed by intense sunlight, which creates sugar, which is used for the flower growth of your marijuana plants.
Uninterrupted darkness is equally important since this is the time that the plant can produce and let off the hormone florigen – if it doesn’t do this, it will not flower.
Learn to harvest marijuana and protect them from various pests in my downloadable Harvest Guide!
If your plant is experiencing a problem due to the improper intensity of the light, there are several methods you have at your disposal to combat the problem.
Generally, more intense light leads to bigger and fatter buds.
This, of course, means a greater yield – and greater success for you as the grower.
It’s especially important to have high amounts of light intensity during the flowering phase since this is when your plants are going to grow their buds as much as possible.
This is the easiest to achieve if all of your plants are the same height, with lots of colas close together.
This is more or less impossible to achieve after your plants have already entered their flowering stage, so if they have grown unevenly then you will just need to work your hardest to make them receive intense light nonetheless.
The tricky part about increasing the intensity of the light in your grow room is to not simultaneously increase the temperature of the room, as the plants need to remain cool during their flowering phase.
One simple way of increasing the intensity of light in your grow room is to move the light so it is positioned closer to the plant.
This has to be within reason, of course, so as not to burn your plant’s tips.
Remember: the best way to increase the size and potency of all the buds is to have each one exposed to direct, intense light.
In general, there is a low chance of you giving your plants too much light.
Marijuana plants use up lots of light in the wild, so to surpass the point of too much would be surprising.
As long as the light isn’t too close to your plants, you won’t have a problem with light levels being too high.
Although it might not seem like it is directly related to light, CO2 is another important factor that comes into play.
CO2 enables your plants to take in more light than usual.
Unless you are reaching the point of the light being too much for your plants, however, adding extra CO2 into the grow room is most likely a waste of time. Read here you want to learn how to build your own indoor grow room!
If you are reaching this point, CO2 will be extremely beneficial to your plant’s end yield.
If you are planning on adding CO2 to your grow room, make sure you seal off the area completely so you can pump in extremely high amounts of CO2.
This density of CO2 is dangerous for humans, so don’t walk into the room with the excess CO2 without taking proper precautions first.
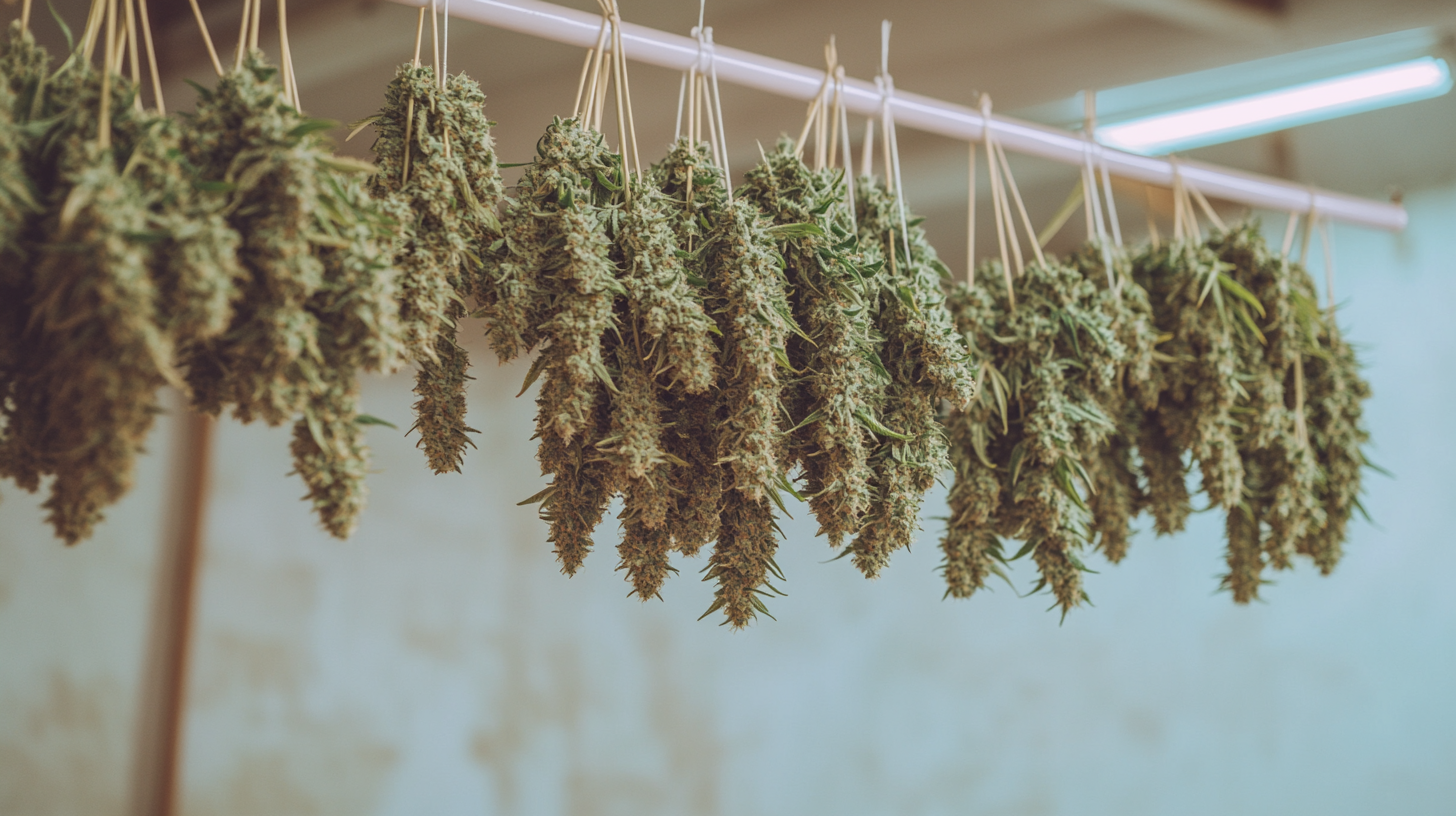
Maintain the best distance to hang your grow lights
You will want to hang your grow lights at the best distance from the canopy to optimize your plant’s growth.
Learn more about the best grow light distance.
Using the best nutrients
If your plants have sudden leaf discoloration, curling of the leaves, death of the leaves or other strange symptoms, the cause could easily be from too little (or too much) of one nutrient.
There is the common identifiable problem called “nutrient burn” that shows your plants are receiving too many nutrients.
Just like people shouldn’t fill their plate with multi-vitamin pills, you shouldn’t bomb your plants with nutrients.
Too many nutrients make both humans and plants sick.
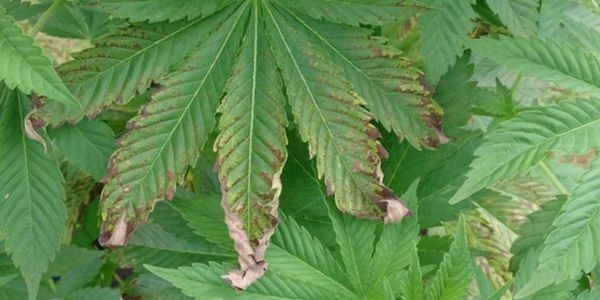
Your plants’ leaves are always the first place to show nutrient problems.
Therefore, if the leaves of your plant all look similar and bright green, you can rest assured that there is no problem with your plant.
Contrary to what some new growers might assume, adding more nutrients will not automatically make your plant more well-nourished.
You need to know exactly how much of each nutrient your plant is going to need, and during which phase. Sound complicated? That’s because it is.
Lots of growers have developed the bad habit of giving their plants too many nutrients.
Another common mistake is when growers who haven’t fully educated themselves mix lots of nutrients together before adding it to their watering solution, without really knowing why or what they are feeding their plants.
There is a tendency to add too many nutrients.
Too many nutrients lead to poor plant health (therefore doing more harm than good).
You need to make sure you don’t let this happen.
Nutrient deficiencies are also detrimental to the health of your plants, so you need to find the balance between the two extremes.
It is actually generally the safer option to err on the side of too little nutrients.
If you use bottled nutrients, we recommend using only half of the suggested amount of nutrients.
Simply do not raise nutrient levels unless you are noticing specific changes in your plant (i.e. leaves turning yellow at the base).
You can also do it when you realize one particular plant uses a lot more nutrients than its neighbors.
You will be surprised by how different the ideal amounts of nutrients are from plant to plant.

Buy marijuana fertilizer
- Nutrients from seedling to harvest
- Maximize your yield
- Enough nutrients for at least 5 plants
- Discounted combination deal
In general, it’s better to have fewer nutrients during your plant’s final 2-4 weeks before the harvest.
If you see leaves dropping during this time, do not automatically assume it is a nutrient deficiency and start adding more nutrients.
This will actually slow down your plant’s bud development, therefore resulting in a lower yield.
Fewer nutrients during this time will also allow your buds to get rid of any residual “nutrient taste” that sometimes comes with plants that have been receiving too many nutrients.
Don’t be afraid to allow some of the leaves to yellow, die, and drop off – it allows your plant to focus its valuable energy on high-quality bud growth instead.
The best way to avoid nutrient problems altogether in soil-based mediums is to form your own compost to make super soil.
It can be totally organic and will give your plant every nutrient it needs throughout its entire life.
You won’t need to worry about deficiencies and toxicities and can instead use your time and energy elsewhere.
Another option is like we mentioned before the Marijuana Booster.
A great product composed of the exact right mix of nutrients to help the plant thrive and double your yield.
Create the perfect climate
If your plant (or one particular spot on the plant) begins turning brown and wilting, you can be relatively certain that the excess heat is to blame.
Excess or sudden cold will also lead to slowed growth and other negative consequences, so make sure to avoid this at all costs.

You need to maintain a steady, healthy climate for your plants to produce their maximum yield.
A too high or too low temperature will result in a poor yield, as will improper levels of humidity.
Make sure always to keep the temperature of your grow room within a certain, consistent range to keep your plants from slowing growth or having other negative side effects.
If you keep the temperature and humidity level at the right spot, the final harvest will be rewarding.
Even the smell and potency of the buds will be improved, so don’t forget about this crucial factor when it comes to maximizing your yield.
Harvest at the right time
You will know you have chosen the wrong time to harvest if your buds aren’t fully ripe, or if they’re unusually small.
Chances are, you cut your potential by about 25% by harvesting too early.
If you wait too long, however, you will also lose some potency and smell.

There is a small window of time that is ideal for harvesting the buds of your marijuana plants.
This window of time is between two and three weeks long.
You need to ensure that you are waiting long enough to allow the buds to ripen completely.

The final two or three weeks before the harvest can make a world of difference – buds can grow up to 25% more during this time!
This is why it’s very important not to harvest earlier than the optimum window.
If you are trying to get a specific high from your buds, you can alter the harvesting schedule a bit.
Buds harvested earlier generally have a buzzy high, best for smoking during the day.
Later harvests lead to a high that is more relaxed couchlock feeling.
Decide when you will harvest based on your personal preferences.
It can be tricky to time your harvest at the right time. You don’t want to wait too long, or your weed may become harsh in taste and sore on the throat. On the other hand, harvesting too early will result in a light taste and suboptimal flower sizes. Check out my article on harvesting or download this little harvest cheat sheet so you can time your harvest exactly right!
Marijuana plant symptoms

Leaf symptoms:
- Leaves curling upward
- Leaves curling downward
- Base leaves yellowing
- Heat-burnt leaves
- Spotting of leaves
- Yellowing or browning leaves
- Dropping and dying of leaves
- General discoloration (red, grey, brown, yellow)
Plant symptoms:
- Tall, “reaching” plants
- Lanky plants
- Nutrient burn
- Browning and wilting
While these five factors are the most common ones that can affect your marijuana plants’ end yield, they are by no means the only factors that have an effect.
There are plenty of diseases or conditions that could affect your plants without you influencing it at all, so you need to be well-educated in terms of potential obstacles.
If you do your homework and are proactive about your plant care, you will be finely rewarded. Check out our Symptom Checker for more plant symptoms.
Choosing the right genetics
While there is nothing you can do after you have already purchased and planted your seeds to affect this, it is still worth mentioning that genetics play a key role in your plants’ final harvest.
Your particular marijuana strain is going to affect the growth, size, and potency of your buds in the end.
The good news is that most strains that you are likely to buy these days have significantly higher yields and potencies than past strains.
They are also generally easier to grow, and this is just getting better and better as time goes on.
Many beginner growers will pay the cheaper price for strains that are not high in quality.
Although their intent was to save money, in the end they will actually get less value for what they paid because the end yield will be disappointing compared to a high-quality strain’s yield.
This is why it is important to invest in high-quality genetics from the beginning.
Looking for high-quality seeds? Check out our seed bank to buy high-quality seeds for higher yields

Buy high-quality seeds
- We ship daily to all U.S. states for FREE!
- Our seeds are guaranteed to germinate
- Produce over a pound of quality bud
- Guaranteed delivery
- Get 24/7 grow support
There are different versions of high-quality strains, of course.
Some strains achieve a higher yield, sure, but others have been bred specifically to achieve other useful characteristics like height and bushiness.
Others were bred to have buds that are extremely potent or fragrant, meaning the yield itself might be lower, despite a higher quality bud.
Therefore, no matter what you do in regards to the other factors that affect your precious marijuana plants, you need to start things off right with a good strain.
Do your research so you know exactly what that strain’s tendencies and expectations are. In the end, you will be glad you did.
FAQ about advanced growing techniques
What is super cropping of marijuana plants?
Super cropping is a pruning technique that helps stimulate a healthier plant, and is done by crushing the interior of a stem, damaging its access to nutrients and water. Once healed, you’ll have a more efficient plant with thicker stems and a stronger foundation.
How does fiming your marijuana plants work?
To FIM, simply pinch the top at the newest growth, leaving some behind. If done correctly, four new colas will grow out of that area. If done incorrectly, you may only see two or three.
Does pruning my marijuana plant cause higher yields?
Pruning, if administered correctly and appropriately, can be a great booster for your plant’s health and overall yield. However, if done incorrectly, it could cause some serious damage to your plant.
Thanks for reading and feel free to drop a comment below or join fellow growers on our support forum!
Robert


Is it necessary or wise to super crop as well as top, or is that overkill? If I did do both, would it be less stressful to just do it all at once, or would that kill it? I’ve seen plants mown over by a tractor go on to heal and thrive… I’ve only ever used LST so this makes me nervous.
Thanks for the info . Will your bible have more about the soil a d breeze .
Awesome turn around on my seed delivery. Wow
Thanks team!
I love it it was badass
Instead of topping off all of the middle, Take just a little off the node this will make the bottom branches and nodes to blow up!!!!!!
I would like a good price on seeds some deals
Outdoor grower in Denver needs info on Elmers X Journeyman strain which are doing well outdoors, Thanks
How does the light cycle for flowering apply with autos…
I have been messing around and desided not to completely top the plant but instead pinch the crap out of the top. it slowed it down enough for the side shoots R nodes to pop out really well and gives the same results as topping . when the pinched top heals again it vegans to grow with the 2 new shoots also. in about 2 weeks so the same without Lousing your top R cola. having really good results with this method to the point I can pinch and bend the new shoots comming from the middle R main top. So if board try punching your top instead of removing it all to gather.
Thanks ilgm did really good with all your tips
Having problem downloading bible
I am sorry to hear that! COuld you please contact the Customer Support so they can send you the link to download the Grow Bible?
Way coolj
My plant started Buddingthen I messed up Ph for 2 weeks it has lost all smell and very lol growth can it recover and do good in3 weeks
My plants are now 12 weeks old and Just keep growing, no sign of flower. Very large bushy plants. How do I get Them to bloom?
Change lighting to 11 hours on 13 off.
If growing outside buy heavy-duty black plastic Garbage bags, make sure you can’t see Threw it, Carefully place the bags completely over the Plants use stakes or support to
the bags on the Plants top to bottom at 5 to 6 pm
Leave the bags on until dark outside or before the sun comes up the next morning,I call it Bagging and used this many times and works great.
Keep this going for 6 days straight and at the same times and before you know it You’ll see those pretty white hairs.
Good Luck
Tony
I have entered my email several times to receive the free PDF grow bible. Is this a scam?
Hi Kelley, you can contact our customer support if you’re having trouble downloading the grow bible. That’s [email protected]
You can always look into youtube videos on fimming if you want to see it done. Thanks for the advanced growing tips.
can I pay for your thanksgiving deal 1/2 price off with a money order I don’t have a credit card yet.
Hi Ronald, sorry but the Thanksgiving deal has passed. Keep an eye out for a next offer. And yes, you can pay in cash, contact [email protected] for more info.
I am still waiting for my seeds purchased months and months ago. All I get isemails which does not help me at all.
buy ilgm seeds then
Agreed on the appearance of re-vegging Monsters (clones taken during flowering). But then they really take off! I’m seeing daily changes! I’m curious now about taking new clone cuttings from these now-vegging Monsters – when they root & grow, what characteristics should I expect? Monster effect continued or, since they are taken during veg period, will they behave “normally”? I’ll find out… hehe 🙂
Thanks for the info. Funny you mention monster cropping, what happen I cut some clones and I had family emergency I had one of my friend took care of my plants, however my clones end up drying. Well, I went ahead and cut some more, however, the plants was already like 4 weeks into flower already, anyway I finally got them rooted like last week now they starting to come along real nice. You are correct the appearance is not ideal 🙂 but I must say they are starting to look wonderful every day…
Thanks for continuing sharing your knowledge and experience it is greatly appreciated!
I agree. The fimming descriptions are kind of vague. It appears like they are just pinching the top half of the two side leaves and the stem. To me it doesn’t seem like that would create , more grow sites. I guess you’s have to experiment to find out. So sorry about your crop. Kind of like me when mine got spider mites. I battled those buggers like crazy. I could get the population down but I never did get totally rid of them and my crop was not very good that time. So dis heartening when things go wrong. But we just got to keep on keeping on. The next batch will be better.
yes it works very well and you still have amain cola but even with everything else.been doing it for years.sco
Having trouble understanding “fimming”. I know pruning, but “fimming” is vague in its description. I think I am being swamped by too much information. I was getting better results when I didn’t “know” so much. My current crop is stunted, and my new seeds were very difficult to sprout. They are showing signs of not growing at all in their intermediate pots. I start seeds in water, plant them in small starter cups. When they get up a bit, I transplant to a larger small pot, then later to their 5 gallon buckets. The seeds sprouted, but are stunted and showing signs of no growth after several weeks. Usually, they look green and healthy. Now, they look yellowed and jaundiced. I am discouraged. I do not “feed” the plants during the early stage of growth. I saw yellowing and brown spots on my current crop, so I added some lime(as advised) to add calcium. This helped, but the well-ventilated plants remain small and about half the size they should be after 3 months. I am letting them grow another month, hoping that they recover. What bothers me most is that my new crop of seeds seem to be anemic somehow. I have done the entire process maybe 6 crops by now. I am seeing diminishing returns the more I “learn”. It’s very frustrating to burn all that electricity and get unsatisfactory results. I am at a low ebb in morale.
Opinion…
I wouldn’t worry about”fimming” until I have a plant growing robustly enough to be visible daily…by your description my first thought is that its to hot…I had the same issue even though I had installed an air conditioner with a digital control I was still burning the plants…I now have air cooled hoods w a high dollar fan and don’t have the problem..I’ve managed to grow 20′ wide by 12′ tall over 190 topped monsters outdoors in over 100° conditions but let the temp get over 80° in your grow room seems to be disastrous
I feel I am not in such a dark spot as you but I feel overwhelmed as well. There are a lot of conflicting information like it’s safe, but the outcome is uncertain, it can harm the plant, but it’s very smart to do etc. I feel I need more objective criteria to evaluate my options and risks levels. Maybe I am simply too beginner but I think I will give up trimming because I fear to do a mess. Also some language is very vague and flaky. How do I know if a plant is lanky? Maybe pics and degrees charts will help. More hard facts and resources and less insider talk. I appreciate you guys.
Thanks!