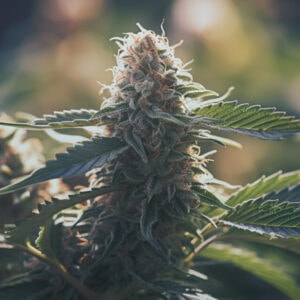
Keeping your cannabis plant happy and healthy comes down to how carefully you care for them through each stage of a cannabis plant’s life. Factors such as how much light should seedlings get should be carefully considered as these are especially important in the younger stages of your plant’s life when they are at their most fragile condition.
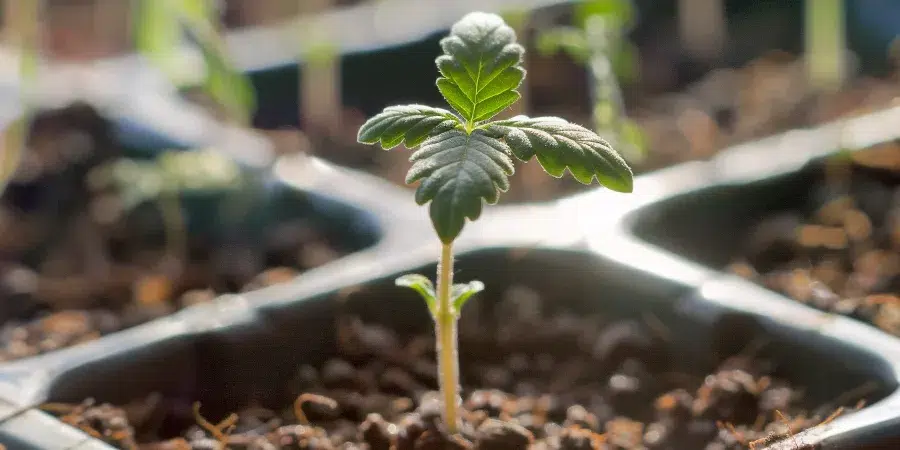
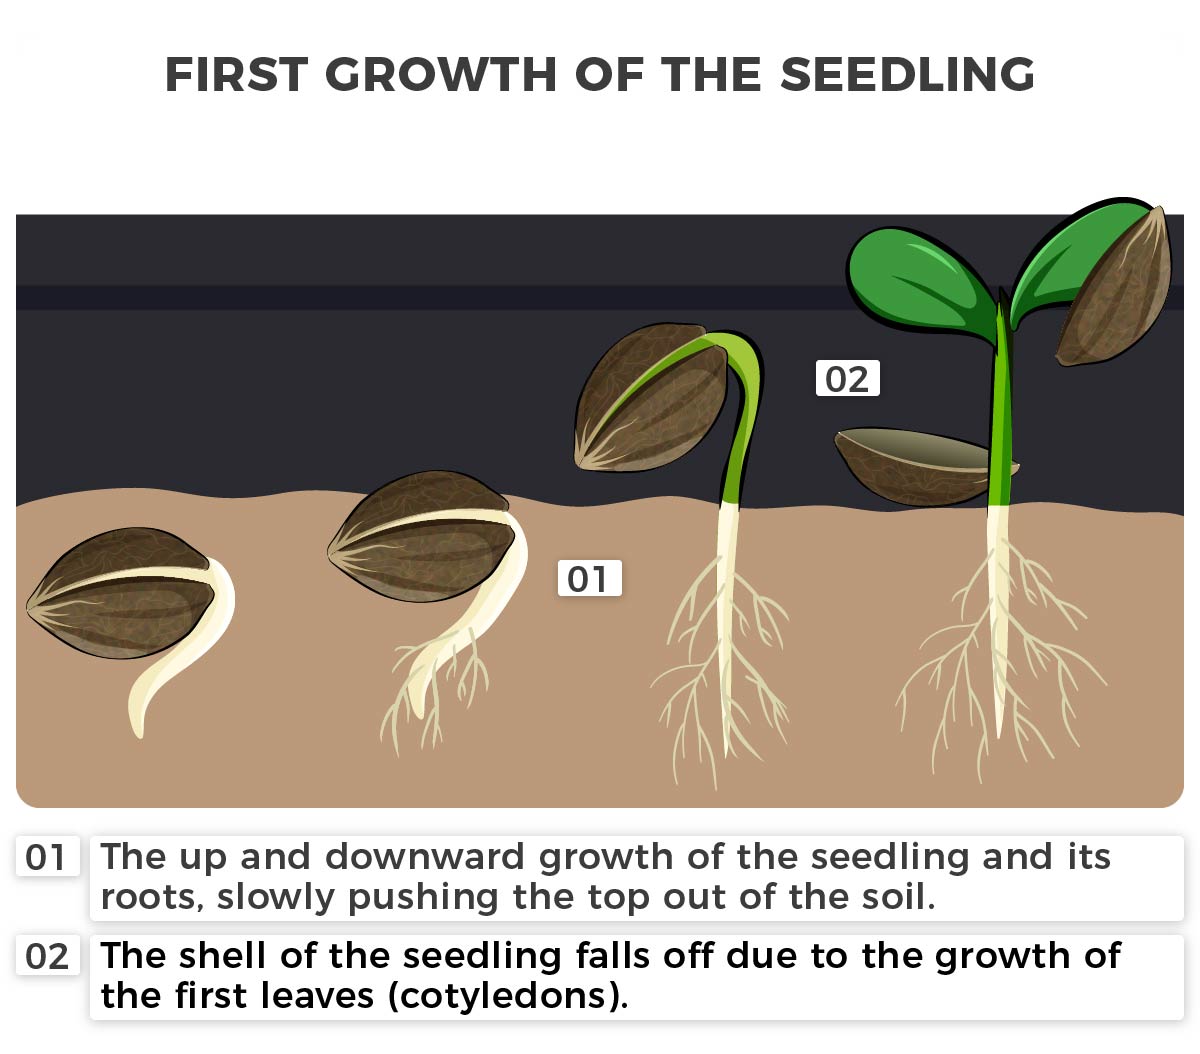
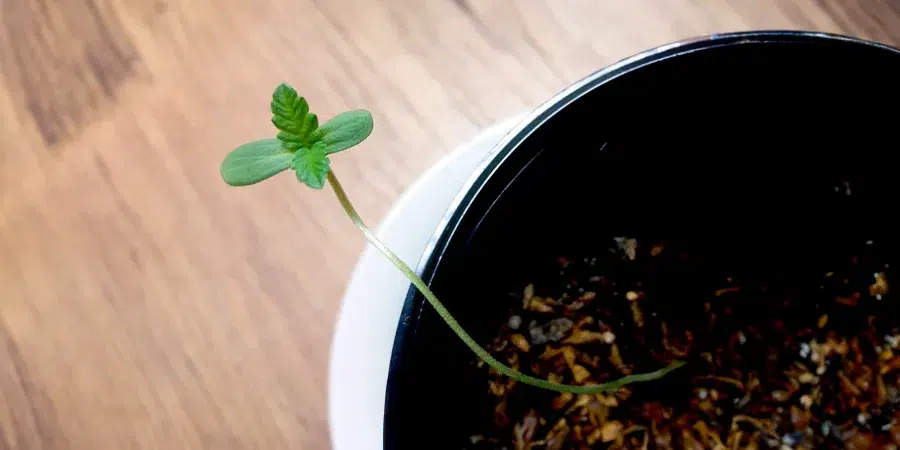
A cannabis seed that sprouts will split along the seam that joins the halves of its husk. Driven by gravity , the tail grows longer rapidly, screwing its way down into the soil until the root can supply sufficient leverage to raise the husk containing the two seed halves upright.
From that position, the two halves fold out to act as biological solar panels that gather energy and begin a cannabis plant’s first chlorophyll production even as the tiny taproot sprouts hairlike feeder roots that stretch outward to strengthen its grip in the soil.
In this article, we take a look at the ways to protect your seedlings through their most delicate stage of life.
What are cannabis seedlings?
The key thing to do during this stage is simply to pay attention and keep tabs on every development or change that occurs in your cannabis seeds. When they sprout, the seeds’ seams will split and allow a white tendril to poke through within several hours of this split. This tendril will grow very quickly, moving downward until it’s deep enough for it to hold up the rest of the seedling (namely the stalk and the seed husk).
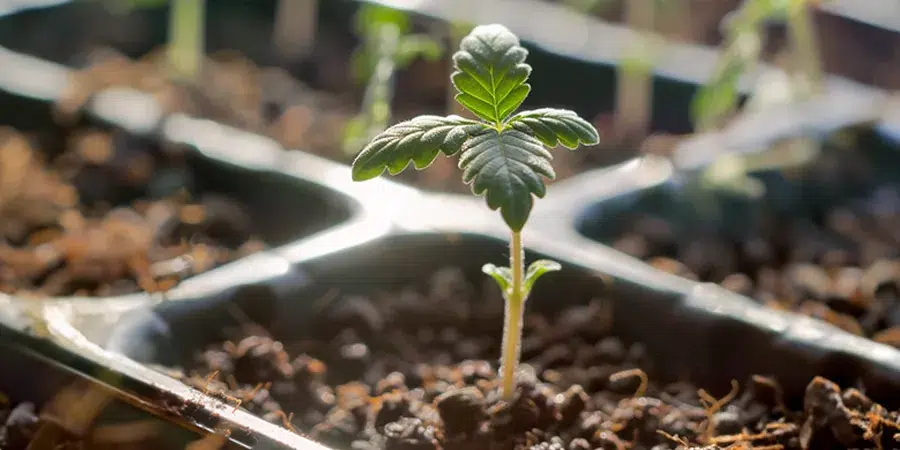
The husk, now split into two, emerges from the ground and functions as a sort of makeshift leaf – in other words, it absorbs energy that can be used to produce chlorophyll within the plant. While you see the stalk growing upwards, you can also be sure that more roots are sprouting and growing downwards at the same time.
Grab my free Grow Bible for more on cannabis seedlings here
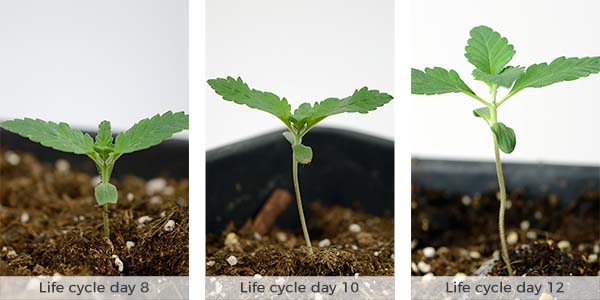
The first two leaves, completely unique from any future leaves that will grow, pop out of the middle of the seed’s split. These leaves are called sucker leaves and mark the beginning of more leaf growth.
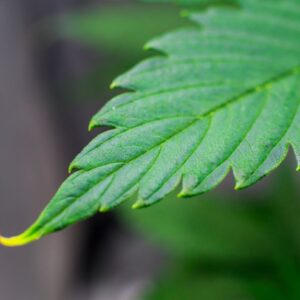
Two-lobed leaves will then grow from the middle of the sucker leaves. These two-lobed leaves usually resemble chicken feet, since they have three lobes. After the three-lobed leaves come two leaves with five lobes, and then two more with seven. Seven-lobed leaves are the ones everyone recognizes as the cannabis leaves.
Two lobed leaves will then grow from the middle of the sucker leaves. These two-lobed leaves usually resemble chicken feet, since they have three lobes. After the three-lobed leaves come two leaves with five lobes, and then two more with seven. Seven-lobed leaves are the ones everyone recognizes as the cannabis leaves.
If you were able to keep your cannabis seedlings healthy throughout its entire sprouting stage, they would most likely go through a very productive vegetative stage. Protecting your seedlings is about more than just survival: it’s about investment in your future harvest.
Also read the article How to germinate cannabis seeds for more about germinating tips
This article covers the various elements you will need to keep a constant eye on to ensure the well being of your seedlings. These elements are protection, water, nutrients, heat, and sunlight.
How to protect seedlings
You will need to protect your seedlings from more than just discovery by the authorities. Even if you live in a location where growing cannabis is legal, you have plenty to worry about with protecting your seedlings.

Buy quality cannabis seeds
- We ship daily to all U.S. states for FREE!
- Our seeds are guaranteed to germinate
- Guaranteed Delivery
- Get 24/7 Grow Support
You should keep your plants in some sort of protected area, such as a rooftop, and shelter it using some sort of a transparent, plastic dome or bubble. These domes can keep your seedlings from being eaten by insects, rodents, or other pests, and they are easy and cheap to make yourself.
Also read “Cannabis pests“
Simply slice a clear plastic bottle in half, then recycle the top half and keep the bottom half. You should cut small slots around the edges of this half so that your seedling will have some airflow. Place the dome over your little plant, completely covering it. This will have the additional bonus of insulating your seedling in case an unexpected frost occurs. In my free Grow Bible, you will find more DIY hacks for your grow.
In addition to insulation and protection, your seedlings will need the most important elements on Earth: water and sunlight. You have to constantly keep the soil and the seedling moist around the clock, and you need to make sure they are receiving plenty of sunlight.
If you live further north, you could have some more trouble with this since your spring days will be shorter than latitudes further south. One big problem that can happen to outdoor growers is their seedlings not receiving enough sunlight. When this happens, the plant stretches taller and taller in an attempt to reach more sunlight, and then it is too tall to hold itself up any longer.
If you want to keep your grow small I can advise a solution like a Pot for Pot. They offer an all-in-one box with everything your seedling will need.
If you have space and resources, you can try sprouting your cannabis seeds inside of a closet to begin with. Using the proper equipment in this environment can give your seedlings plenty of sunlight, giving them enough energy to sprout large, healthy leaves right from the beginning.
Related guide: “Growing cannabis safely“
This type of growing would also ensure that their stems won’t get too long and weak; rather, they will be short and strong. You will be able to avoid the hassle of stabilizing tall, weak stems with sticks. If they don’t do this while the plant has leaned to the ground, it could begin to rot.
That being said, if you start to grow your seedlings indoors, transplanting the seedlings later will be necessary, which presents its own difficulties and safety concerns for your young plants. Ultimately, it depends on which option is best for you.
How much water do seedlings need
One common problem that occurs when trying to care for a seedling is giving them too much water. It is actually less of an issue having to do with too much water, but actually has more to do with too little oxygen reaching your plant’s roots. This happens most commonly with seedlings being grown in containers since water can only go so far as the walls of the container.
If your seedlings are being overwatered, you will most likely see symptoms such as drooping leaves. There are plenty of ways to avoid this, however, as long as you keep reading for a better understanding. Your planting situation is the most important factor that comes into play when considering how you have managed to overwater your seedlings, and how you can fix or avoid the issue.
Overwatering your seeds
Your pot is too big for your seedling
Since a young plant’s tiny roots absorb much less water than their more mature counterparts. If you water as much as the container can hold, these tender roots will not be capable of taking it all in. This situation occasionally referred to as “overpotting,” leads to overwatering. So how do you prevent this situation from happening?
The best thing to do is to begin your seedling’s life in a smaller container to begin with. Once they have grown a fair amount, you can move them to a bigger container. If it’s too late and you need to fix the issue, simply direct your watering to a specific area: a little circle right around your seedling. Once the topmost inch of soil is dry again, you can do another round of watering. You can only begin watering normally.
If you plan well enough in advance, you can have a separate container for each of your cannabis plants’ stages of life. If your seedlings will be living in containers for the entire growing season, you will need to know in advance the size of your last container.
In other words, you will have to have a good idea of how large you would like your plants to become. Because roots grow more rapidly when they are left in one container for a long time, fewer transplants mean a larger size plant (and therefore container). Take that into account when planning your container sizes.
Your pot is too small for your seedling
You can plant seedlings in very small individual containers, such as a solo cup. You can’t keep them cooped up in a solo cup forever, though since their roots will quickly outgrow the small space. If your plants are left in a small container for too long, they will become “root bound.” This means that the roots have wrapped themselves around the outside of the cup, keeping water on the inside from escaping.
Why is being root bound such a bad thing? It can lead to some pretty big problems, including overwatering, nutrient deficiencies, wilting, and more. You can avoid this problem simply by changing the size of their containers as frequently as necessary.
Poor drainage
If your plants’ container does not have an efficient drainage system (i.e. holes punched in the bottom of the container, plus the right kind of soil), overwatering will quickly become a problem that could be life-threatening to your plants.
One way to keep this from happening is to start growing your seedlings in a soil that drains well from the very beginning. Soils that are clay-based, for instance, retain water and, therefore, should be avoided.
You can also begin with a smaller container, which would help prevent the issue that was mentioned above. Make sure your container has lots of holes where water can drain from.
If you ever notice that water isn’t draining as fast as it should, you can add perlite to your soil to increase the oxygen content. Don’t water your plants quite as often until you notice them drinking more, or try using a Smart Pot instead of a normal pot.
If you follow these tips and are careful about watering your plants, you should be able to avoid overwatering them altogether.
Underwatering Cannabis Seedlings
If you’re sure you haven’t been watering your seedlings too often or too much and they are drooping or wilting, the culprit could actually be a lack of water. Sometimes people who know about the common occurrence of overwatering seedlings have overcompensated, therefore actually watering their plants less than is required.
The roots of your seedlings need to constantly be able to access water. Seedlings lose the water they have absorbed through their leaves in a process called transpiration. They do this by sucking up the water from the roots like a straw. If this process keeps going and the roots down below are not receiving enough water, the plant will undergo some serious problems.
If you are able to visibly notice your soil separating away from the container it’s in, you probably have an underwatering problem on your hands.
If your soil is enriched with nutrients and you underwater your plants, the effects will be even more devastating. Your plants will turn a dark green color and will have twisted new growths of a strange color. In this case, the only thing you can do is give your seedlings more water to re-establish their roots and begin growing once again. If they receive enough water to fight these effects, they will probably be able to combat this situation.
What kind of nutrients
Giving your plants nutrients can come with its own issues. If you give your plants too high a dosage of nutrients, for example, it will turn into nutrient toxicity. Your plant’s leaves will have tip burn and turn darker in color.
Toxicity
Nutrient toxicity can be caused by using a “hot” soil or a type of soil with a lot of nutrients. As long as you are watering your seedlings enough, they should be able to grow out of nutrient toxicity that comes from using hot soil.
Some soils are “slow-release,” such as Miracle-Gro. Avoid these soils at all costs, as they will not help your plant be healthier – in fact, it makes them even more susceptible to nutrient toxicity.
If you provide your seedlings with nutrients when they are too young, they might have a sort of nutrient overdose. As long as your initial potting mix is high quality, you shouldn’t need to worry about adding any more until after a minimum of a few weeks.
If you feed your seedlings with a large amount of nutrients all at once, you could end up with nutrient toxicity in less than a day. If you’re using a nutrient schedule that comes with the store-bought nutrients, half the amount it says and see how your plants react before adding any more.

Buy marijuana fertilizer set
- Nutrients from seedling to harvest
- Enough nutrients for at least 5 plants
- Discounted combination deal
Deficiency
If you use the wrong type of nutrients or bought a potting mix that isn’t right for cannabis seedlings, your seedlings could end up with a nutrient deficiency. You can identify this problem by yellowing, folding leaves starting to form on your plant. They will eventually wilt and drop off.
These leaves are located on the bottom of the plant, but if they are located only at the top, then nutrient deficiency probably isn’t a problem for that seedling. Nutrient deficiencies always affect your older leaves first.
You can avoid any such problems by making sure that your plants have the right type of nutrients and by providing more nutrients as the plants “use up” their current soil. Additionally, if you’re growing your plants without soil, this doesn’t mean that you don’t need to provide nutrients.
Problems could also arise if the soil isn’t kept at a balanced pH level. Even if the right nutrients are present, with the wrong pH level, your plant could experience nutrient a deficiency. If you are watering your plants poorly, this could also have a nutrient-related effect on your plants.
Additionally, keeping your plants in a container that is too small for them for too long will cause nutrient deficiencies, simply because it will become root bound and will keep your roots from working properly.
For a list with all nutrient deficiencies check the article Nutrient deficiencies in cannabis plants.
The ideal temperature For Seedlings
The temperature should remain near 73 degrees, but if it’s too hot then simply move the lamp further away from the seedling. If your seedlings are experiencing temperatures that are too high, their leaves will start to curl upwards and form a canoe shape.
You can solve this problem simply by lowering the heat. These symptoms occur more easily when your cannabis plants are also not receiving enough water.
How much light
If you’re germinating your seeds indoors it’s best to place your seedling in containers under fluorescent lights , since the lights do not use too much power and don’t emit much heat, allowing you to place them quite near the seedlings (2 to 4 inches).
Make sure to have the cfl on at intervals of 18 hours on, 6 hours off. If you’re using HPS grow light place them as close to the seedlings as possible but don’t let temperature exceed 77.
If you’re germinating outdoors it’s different. It is safe to say that sunlight is most important when your plants are first starting to sprout. Don’t be afraid of giving them too much light – it is almost never enough, as long as you keep your plants’ other needs in check (i.e. keeping their soil consistently moist).
It will be obvious when you aren’t giving your seedlings enough light since their stems will be somewhat white-colored, tall, and thin. Basically, it’s your plants’ way of trying to reach as much sunlight as possible.
That being said, every plant has something called their “light saturation point,” or the point when plants can’t utilize every bit of sunlight that they are being exposed to. As long as you keep your lighting within a reasonable amount, your plants will probably not reach their light saturation point.
If they do, it turns into a waste of light, electricity, and time – when a plant is receiving too much light, it actually does not grow as quickly, since there is no point for it to grow bigger for the purpose of receiving more sunlight when it already gets too much.
TIP: Looking to buy seeds? Visit the ILGM cannabis seed shop

Buy autoflowering seeds
- Flower automatically
- Fast and easy to grow
- From seed to bud in just 10 weeks!
- No light cycle management needed
- The best beginner option
A simple way of reducing the amount of light your plants are receiving is by moving your lamps higher, making them further away from the plants. If they need more light, move the lamps closer. It’s as simple as that!
Sometimes people think autoflowering plants don’t require light to grow. That’s incorrect. Autoflowers need light to grow and develop, they just don’t need light shortage to initiate flowering.
Avoid stretching
Cannabis seedlings that are stretched out tend to be that way because of certain environmental factors. Stretched out cannabis plants will not produce sturdy stems that can support several branches, buds, and leaves. So, it’s important to ensure that the cannabis plants aren’t stretching out too thin.
A simple solution to this problem is to bend the stem back and forth. While this might seem to put a lot of stress on the plant, it actually forces the stem to tear and then rebuild in that space. The stems become much sturdier as a result.
Tip: read everything about the vegetative stage or flowering stage
Other solutions to this problem include using an excess of blue light, maintaining temperatures at around 80*F, or making sure that plants have all the light they need available to them. If light is scarce, the plants will start to elongate in order to reach the light source. For more tips on how to avoid stretching, read the article Stretching cannabis plants
FAQ about how much light should seedlings get
When do I put my seedlings under light?
You need to place your seedlings under some light when you’re germinating them.
How far should seedlings be from grow light?
Your seedlings should be about 2 to 4 inches from the grow light. However, if you’re using HPS grow lights, you’ll need to place them as close as possible while monitoring the temperature so that it doesn’t exceed 77 degrees.
What’s the recommended light schedule for seedlings?
The grow lights should be on for 18 hours and off for 6 hours. For more information on lighting, check out this article out.
Once the plant is fully grown you will need to start thinking about flowering and harvest time. Our free little Harvest Guide will help you determine the best moment to cut your plants. Download it here.
Thanks for reading. Please leave comments or questions below and don’t forget to download my free grow bible
Robert


Looking forward to growing my little seeds!
Hi Tommy,
We’re happy to hear you’re excited to get them started!
Happy growing in advance!
Alex ILGM
I have a seedling in dirt that has been sprouting for six days and the stem is about 3 inches long, but the husk has not opened for the leaves to come out. Any suggestions?
Hi there,
Thanks for your question. You can use a tweezer to gently remove the husk if the sprout has difficulty shedding it by itself.
Hopefully, your seedling made it despite the husk being stubborn!
Happy growing,
Alex ILGM
I have a seedling in dirt that has been sprouting for six days and thestem is about 3 inches long, but the husk has not opened for the leaves to come out. Any suggestions?
I’m glad you wrote this article. I’ve just begun to grow and this article has pointed out a few mistakes. Hopefully, I can fix the problems now that I know more about what to do and don’t do.
We shall see…
I am interested in this topic
Why don’t you sell bulk/large packages of nutrients? I’ve used yours several times in the past and you don’t carry them anymore…Will you have this in the future?
I love growing.
Hi. In the last 12 months. I have ordered 3 lots Auto flowers , some were duds, some got Root rot, using the D.W.C. System. 1 Gorrilla Glue auto survived producing about 15 grams of flower.. all a piss poor effort, waste of time and $s. I am going to try the Coco Coir system with the normal flowering growth seeds I Had more luck. I have been growing indoors / outdoors for many years and a had reasonably good results in the past. I live in West Australia, very hot climate.maybe that’ why the Autos cant Survive. Sorry for dumping my Shit on you Guys. think I Will shop around for my next order, Stay Happy, stay High
My seedling is about a week old. At what point do I top the plant to make it a bush?. And how often should I do that?
Awesome advice! Thanks heaps much appreciated!! Now I know why my seedlings were so stretched!
So I germinated indoors but made the mistake of putting the seedling into a bigger pot so I dont have to transplant at all in risk of putting my plant under to much stress. How much water should I put in the container? Just a little around where I planted it so I dont over water it? First time ever trying so it’s a little confusing and I dont want to lose this seedling that has popped through soil yet. I just put it in the soil a day ago so I dont expect it to show itself for atleast a couple of days. Is this correct
My plant leaves have brown on the tips?
Thanks for the info, I’m excited to see my first time grow
I’m struggling hardcore. I can get my seeds to pop. Then I transplant into rockwool in a net pot over a dwc bubbler. I can get the first two fan leaves and maybe a second pair. But then growth just stops. I have a 1000 led grow light at 30” away. I was overwatering my first couple of attempts but now I’m careful not too. How long should I give a seed before I give up on it growing?
Very useful… downloaded grow guide.
Would like to know how early you can use insecicide..
Hi! I just started growing for fun and I have one plant and two seedlings right now. One of my seedling grew normally but has now split into two and has two peaks. Does this mean anything? Is it a normal thing? Related to sex? I’ve searched the internet and can’t find an answer so thought I’d ask you! Hope you are staying well and have a great day!
Thanks for all this info. First timer.
How long does it take for a seedling to pop out of the earth? I planted my sprouted seed a week ago and nothing…
I’m a first time grower trying to grow with a hydro grower, how do I proceed? It’s already starting to sprout, my watering procedure is 12 hrs on 12 hrs off same with the lights. I need help, thank you
I had problem with my timers so my seedlings were subjected to three or four days of steady light and no darkness. They seem to be not growing. No noticeable growth change in two weeks or more. Has this ruined the seedlings?
Hi, I bought 10 seeds, followed instructions carefully, they all germinated, I planted them but only 6 of the seedlings grew. I know they are guaranteed to grow, we would you recommend for me now? Thank you, Bill
I just put some Sprouts in some soil and I was wondering what kind of white they should get how much how close should I place the light.
Okay, I’ve looked in the forums, but I can’t find an answer. And online-only “white” stems are showing a fungus, and this isn’t a fungus. I have a seedling that sprouted (Star Killer), has a leaf “bud” on the end, but the stem is almost completely white, and I don’t know why. PH is neutral, in a peat pod (Why are these all capping each first letter?), no additives yet, moist but not wet, currently under a 600w LED blue/red (Mostly red, with just 4 blues LEDs, for vegetative states) I’m new, one seedling is stretching but leafed and good (Put it under light too late so it was stretching, but it’s strong) this is the same seed type, and the stem just… so pale it is almost white. Not powdery (No particulates under a magnifying glass). I don’t understand and since I’m new I literally have no clue what the heck, plus I have a major black thumb, I mean I killed peppermint by planting it once. haha. Or who to ask for help before it dies (It’s been 24 hours this way) Not a fan of having to buy more seeds quite yet.
***mOSTLY blue NOT MOSTLY RED, THERE ARE 4 RED leds AND THE OTHER 2 DOZEN ARE BLUE.
Wow, seriously, the typing here is so weird haha.
Okay, but… when growing outdoor, should i put the plant into direct sunlight from the get go? isn’t the plant too weak, at this beginning point? And what is considered stretching??? Like, how many inches? These informations should be put in the article. it’s like: “Don’t let your plant stretch”… gee, thanks champ, but how will i know if it is stretching or if it’s just normal growing???
Yaaaay Reading your blog post on seedlings helped me find out what I was doing wrong. Thank you so much…ronni
They are in fact tough. But, there is a massive difference of wuality in product. To an experienced grower of 10 years with a plant based education…i can tell you ph is possible the only thing worth measuring. I may have been able to agree with most of what you said….but uptake of certain nutrients happens at different levels on the litmus scale. In the tround with tons of buffers found naturally in the soil, its less necessary outdoors. But, indoors. Using geowth media that is not outdoor soil. You need the buffers and ph scales. Not gullible buddy. Educated.
Hi Good Morning my name Eagle I have a couple of seed that just sprouted I put them in separate pots all them came out and leafs started to show but one It’s white widow the tip of the plant was cut off you know where the leafs usually start to come out but the root part is in the ground / dirt still its white don’t look dead so I’m wondering is my plant still going to live grow ??
When can I switch from cfl lights to led 2000 watt blue spectrum veg lights with seedlings that just sprouted?
Thanks for all the info. I have found that I am able to relate to this article wayy better than the others. I have one plant that is in the flowering stage and I just planted my 2nd one sinve the seed has germinated! Thank you for all the help
Very useful info thanks for the article
On about the fourth day, my plant grew one leaf. the next day i noticed the leaf was gone (probably eaten by a bug), but the stem was still present. Will my plant continue to grow or is it dead?
Am Starting with white florescent. Cup containers. Then to 1 gallon finally 5 gallon buckets.at what point should I go to the final grow light which is 600 watt. Got my seeds from you and if good luck this year you will have new regular customer. Thank you.
I have a question about my seedling , it is growing healthy but when it got its first set of spiny leaves one of them got light burn and i was wondering should i just leave the leaf on or will it be harmful to take it off ?
Thank you so much for the information
I have a seedling that spouted and opened up with 3 big leafs and 3leafs in the center and idea what causes this
Joe,
due to the high level of hybridization found in genetics these days; We are seeing all kinds ofinteresting differences in plants from time to time.
I would love to see a picture of this seedling to truly understand what you are experiencing.
Go here: ilgmforum.com and share your seedling with the community. Thanks 🙂
” If you’re using HPS grow light place them as close to the seedlings as possible ”
This practically guarantees to kill your seedlings. Furthermore, direct, intense High Pressure Sodium light isn’t necessary at this point. Try a fluorescent or CFL. If you must use a HPS, place it on lowest setting (if dimmable) and keep at least 2 feet away.
BTW, thanks for re-sending the shipment. 100% germination within 24 hours using towel method.
Bravo!
Actually David, He said this …”If you’re using HPS grow light place them as close to the seedlings as possible but don’t let temperature exceed 77.”
I noticed the mention of using excess blue light to help seedlings strengthen their stems. I’m doing an experiment with that right now. I had heard blue light was needed in the veg stage much more than in flowering, so I wanted to see if it made a noticeable difference.
I want this book ‘marijuana grow bible ‘
what is the height from light to early growth when starting off
Thanks I really appreciate your time. I ordered seeds from here and I’ll join this forum after I finish this message.
I had a change of strategy… I located a spot in my house that receives direct sunlight from a window. The light is gone by 2 or 3 in the afternoon but surely this enough to get the plants started, for just the first month inside, then transplant and move outside. So if I plant seeds first of April, move month old plants outside first of May.. and then if the plants are harvested in October that’s a growing season of over 5 months. Is this too long should I wait to plant seeds later in the spring? Or no? I’ll be growing in 5 and 7 gallon pots and might try to put some directly into the ground. THANKS
Joseph
Hi. Northern California. I live where I can grow outside. But I’m thinking it’s best to start plants inside? Say, in March. Then move them outside when they have a foothold. In about a month or how long do you think I should keep indoors before moving out? Indoors there is no direct sunlight at all so I’m going to have to use a light but I obviously want to invest as little money in that as possible as most of the grow will be outside. Can I get away with using these LED floodlights I happen to have? Or should I get a grow light of some variety? And how long should light be on daily?
Joseph,
Most growers use a 18/6 photo period for the veg cycle. I like a shorter period more like 16/8. (better root development)
I would want my plant to be about 1-1/2 to 2′ tall 🙂 before I moved her outdoors.
Go cheap and you grow cheap. IN order to produce a plant that will withstand outdoor conditions when you move it outdoors will need to be developed well in order to have a strong finsih result. Cheap low output indoor lamps will produce only a weaker plant.
I suggest you spend a couple hundred bucks on a nice Iposer digital 600 watt lamp.
If you join our forum; We have lights listed in our buyers guide for you to research and make an informed choice.
Peace, lw
Hello Art,
Hopefully you have your seedlings in a small pot. I would let them go, and when you transplant work out the placement of each towards the middle in the new pots
You can always join our support forum for friendly grow advice. Happy growing.
Hi ok getting nice sprouts on 2 of 3 WW so far. Those 2 seeds have sprouted closer to the edge of the pots center, probably from my improper watering at the beginning. How major is this and does it mean I should transplant earlier?
Hi Me, contact [email protected]. They can hook you up 😀
Wher is my free book!! I didnt get one either.
Where is my free book
Hi me, all grow guides will be send to you when you start the download here: https://ilgm.com/grow-bible. Please contact [email protected] If you have any issues with the download.
Sprouting and growing plants in large nursery containers on a sunlit deck–which I have done for more than a decade in NC–I have found the biggest problem faced was the sprouts being bitten off within a day or two of breaking ground. Experience taught me that after eliminating all the obvious, slugs cutworms et al., it was the resident garden birds, primarily Cardinals and Siskins, to be the culprits. However this behavior was easily controlled by placing clear plastic (store bought) plastic cake containers over the nursery containers. After about a week of growth the seedlings are large enough so the birds no longer feed on them. But as the plants begin to reach maturity and seed, the birds will be back to feed, oftentimes destroying the forming budheads, which is a more difficult, yet not impossible, problem the control.
marquise,
You can sew your seeds directly into soil. You will have to be diligent in keeping the seedling alive. A good seed will germinate under proper conditions in 2-3 days. I cannot advise you how long it would take for a seed to sprout in open soil.. 🙂
It is always advisable to start seeds in a controlled environment and allow seedling to flourish before setting it outside. There are no shortcuts to successful Cannabis cultivation. 🙂
[…] soon as the seedlings pop their heads out of the soil, it’s vital to inspect the distance between the plant and the […]
is it okay to plant tour seeds into soil without germinating them in water first?
how long should it take to see sprouts?
I always germinate in soil…just keep it wet and usually see a sprout poking it’s head up in 4 to 5 days. Hope this helps
[…] you do have seedlings that are exhibiting signs of damping off, you probably won’t be able to save them. More mature […]
[…] what they eat. The most harmful mole crickets eat roots and shoots of plants. They also love to eat marijuana seedlings, which could be a terrible thing for your marijuana […]
[…] is especially important when your plants are seedlings. You need to make sure that the soil consistently remains moist so you will need to water […]
I would like for you to talk about growing in hydoponics from seedlings to harvest
Hi Tim, Thanks for sharing what you would want to see on the website. We are always working on new articles, so keep an eye on the website. In the meantime check out this article on hydro https://ilovegrowingmarijuana.com/hydroponically-marijuana-growing-indoors/
I’m pretty certain that cannabis plants are a lot tougher than we give them credit for. I am equally certain that they do not need all the interference with their growth that are listed in many grow books in order to produce the results that are required from them. These species have lived with humans for many thousands of years growing on their own for the most part with no assistance from us. I do not bother with soil PH or any other measurements for that matter and i am convinced that the suggestions that they be done are just to sell the gadgets to the gullible and there are a lot of gullible stoners out there with more money than sense.
My grow is doing very well thank you with none of these gadgets. I grow indoors in a filtered tent under CFL lighting and with fairly small quantities of nutrients. Because my current grow is hydroponic I just change the water completely every week or so and add fresh nutrient. Once flowering starts I change to a higher Phosphorous nutrient and change to 2 red spectrum lights 2700K at about 650watts (output) per lamp with lots of white reflectiors to spread the light. Yields are good to heavy and usually in the region of 250 to 500g a plant dried and cured weight. Which if I were to buy it would cost me between 2.5 to 5 grand at current UK street prices and will last me for a very long time 🙂
Growing hydroponic now Brian….could you point me to some reference on controlling ph and algae……having a bit of a problem there
[…] pests curl around the bottom of seedlings and chew through the stems, basically beheading it. You can identify the presence of cutworms when […]
i did all the steps 10 w widow no luck what do i do now help
It’s important to note that the pointed end of the seed should be placed up in soil. When the root tip emerges, it’s from the pointed end. The tip will go up a bit at first, then curve down towards the big end. After bit when the root is long & strong enough, it’ll lift the big end up out of the soil. The big end will then go nearly straight up in the opposite direction of the root.
You can plant seeds sideways & get away OK, but avoid putting the big end up. The seed will still grow, but will be upside down & will usually correct the mistake, but NOT always. Plus it has to waste a lot of energy correcting itself as it re-orients & uses time that could have been spent looking for the light as the seed case cracks. I learned all this the hard way. 😉
mM
Thanks for the tip and sharing medMUser.
I love growing weed !
Although the comment that I’m responding to is a bit over 4 yrs old, the response should still be helpful for others people that may be new to growing. The best advice that I can give to anyone who’s thinking about growing cannabis for the first time is this: Do yourself a favor & get acquainted w/growing plants, ANY Plants. Get a small houseplant and see how you do. If you live in a warmer climate or it’s summer time, try growing some vegetables, especially tomatos. Just make sure that you familiarize yourselves with the basics of what it takes to grow a healthy plant. It can be very tempting to just jump in head first & tell yourself that you’ll figure it out, which could be the case. Just remember though that even seasoned cannabis growers will still have problems from time to time; how well do you think it will go if you’ve never even grown one plant? Cannabis seeds aren’t exactly inexpensive, especially when compared to other seeds like vegetables. It will serve you well to learn the basics before plunking down a chunk of change on some seeds and diving in. As for the comment from Firesoul, if you bought only 10 seeds and are new to growing, you probably shouldn’t have planted them all at once in case you run into problems, but I’m sure that you already figured that out a few yrs ago. Plant a few to get a feel for them if you must jump right in, but a little knowledge goes a long way. Puff, puff, pass